Mr. Handyman explains how to build a simple firewood rack for organized wood storage.
|
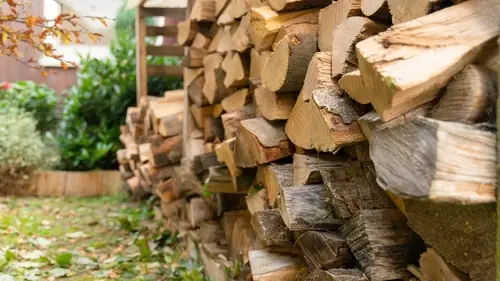
As cold weather approaches, thoughts turn to warming up by a toasty fire or roasting hearty meals over a wood-burning stove. But by the time chilly weather hits, it may be too late to get your firewood clean, dry, and organized. If your firewood is currently stacked in a pile on the ground — or not stacked at all — it’s time for an upgrade.
A DIY firewood rack is one of the simplest, most satisfying home projects you can take on. Whether you want to store a whole season’s worth of firewood or just enough for the next few chilly days, these seven smart ideas for how to build a firewood rack are easy, affordable, and very doable, even if you’re not super handy. Let’s get started!
Why Build a Firewood Rack?
Besides giving your inner DIYer a high-five, building a firewood rack is one of those simple weekend wins that pays off all season long. Storing your firewood off the ground keeps it dry, organized, and properly seasoned, which means fewer smoky fires, less mess, and no panic-scrambling for dry logs in the rain or snow.
Plus, it’s hard to top the satisfaction of a perfectly stacked pile of firewood resting in a rack that you built with your very own hands.
Whether you're prepping for cozy nights by the fireplace or stocking up for outdoor bonfires, a firewood rack adds just the right mix of practicality and pride.
What to Know Before Building a Firewood Rack
Before you start stacking wood like a seasoned homesteader, there are a few things to know that will make your DIY firewood rack last longer, work better, and look great all winter long.
Here’s what to keep in mind:
- Choose a dry, level location: Keep your rack off soggy or sloped ground to prevent warping, rot, or wood that refuses to dry out.
- Elevate your base: Keep firewood off the ground to protect it from moisture and pests. Even a few inches makes a big difference!
- Let it breathe: Good airflow is essential. Plan enough room to leave space between logs so the wood can season properly without trapping mold or mildew.
- Face the sun: The more sun exposure, the faster firewood dries. South-facing spots tend to be best.
- Build for your burn habits: Don’t overbuild if you only use a small amount of wood. On the other hand, if you like a roaring fire every night, plan accordingly.
Once you’ve got your prep work nailed down, you’re ready to start building. Let’s jump into 7 easy firewood rack ideas that deliver warmth, order, and DIY satisfaction.
When your rack is finished and your wood is neatly stored, don’t forget to keep your fireplace or stove in top shape. Check out our guide on wood-burning fire maintenance to keep your hearth clean and cozy all season long.
How to Build a Firewood Rack: 7 DIY Ideas
Whether you’re working with scrap wood, cinderblocks, or a trusty bracket kit, these seven DIY firewood rack ideas will keep your logs organized, elevated, and ready for the next cozy night in. Let’s break down the best builds — from beginner-friendly to patio-worthy.
Simple Firewood Rack Kit
Beginner friendly!
If you’re short on tools or just want the quickest path to a sturdy wood rack, a firewood rack bracket kit is a solid choice. All you need are six standard 2x4s, and you’ll have your rack ready in under 10 minutes.
How to Build This Firewood Rack
- Pick up a firewood rack bracket kit (available at most hardware stores).
- Cut the 2x4s to your preferred length. Longer boards = more firewood storage.
- Slide the boards into the brackets and tighten the included screws.
- Place the rack on a flat, dry surface outdoors.
Why It Works: Firewood rack kits are adjustable, beginner-friendly, and don't require any sawing or drilling.
Firewood Rack Made from Metal Garden Beds
Love a good upcycle? Repurpose a corrugated metal planter box into a sleek, modern firewood rack. It’s sturdy, weather-resistant, and adds a unique touch to your backyard or patio setup.
How to Build This Firewood Rack
- Flip a metal garden bed on its side.
- Use the included bolts and a wrench or pliers to secure the frame.
- For added stability, anchor it to the ground or place it against a wall.
- Stack your firewood neatly inside the open cavity.
Why It Works: This idea requires minimal effort but delivers a high-end look — no cutting, no fuss, just functional flair.
Firewood Rack Made from Wood and Cinderblocks
No tools required!
If you’ve got a few cinderblocks and old 2x4s lying around, congratulations — you’re halfway there. This classic DIY rack is budget-friendly, tool-free, and surprisingly sturdy.
How to Build This Firewood Rack
- Place two cinderblocks on the ground, spaced to fit the length of your 2x4s.
- Insert one 2x4 into each hole vertically on both ends (these act as side supports).
- Lay two 2x4s across the top of the cinderblocks as the base.
- Stack your firewood securely between the upright supports.
Why It Works: It’s fast, flexible, and easy to break down or move if needed; plus, it’s a great way to use what you already have on hand. Once your rack is in place, make sure your firewood stays dry and burns efficiently by following these firewood stacking tips for proper airflow and safety.
Wood Pallet Firewood Rack
Do you have old wood pallets collecting dust? This project turns them into a rustic firewood rack that’s functional and eco-friendly — plus, you can build it in under 30 minutes.
How to Build This Firewood Rack
- Choose two sturdy pallets for the base and back.
- Join them in an L-shape using wood screws or metal brackets.
- Cut and attach additional pallet slats or 2x4s on each side to act as end panels.
- For extra support, add corner braces or angled wood supports.
- Finish with wood stain or sealant for durability and style.
Why It Works: Pallets are strong, cheap (often free), and already partially constructed. This project is beginner-friendly and adds a rustic touch to your outdoor space.
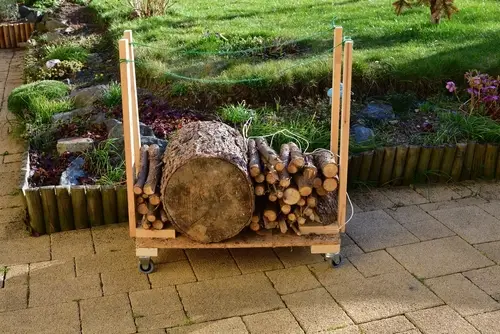
Rolling Firewood Cart
Need firewood nearby but hate the mess? A rolling firewood cart is your solution. With wheels and a sturdy frame, you can move the whole stack with ease, and clean underneath it too.
How to Build This Firewood Rack
- Start with a steel utility cart frame or repurpose a hand truck.
- Add wooden slats or metal bars on the sides to keep logs in place.
- Secure a wood or metal base on the bottom for support.
- Attach heavy-duty, outdoor-safe caster wheels (locking casters are ideal).
- Sand rough edges and paint or seal for weather resistance.
Why It Works: This mobile rack is perfect for patios, porches, or garages. It’s convenient, keeps pests away, and lets you tidy up with zero heavy lifting.
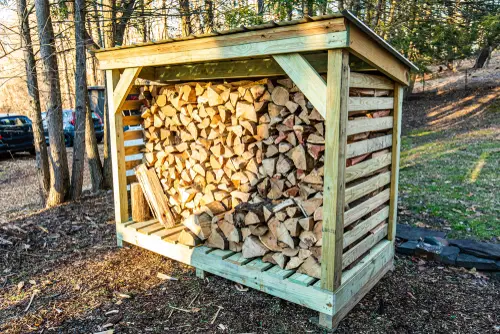
Sturdy Outdoor Firewood Rack
If you want something durable that can weather the seasons and hold a hefty amount of wood, this hardy rack is the way to go.
How to Build This Firewood Rack
- Use pressure-treated 2x4s or 4x4s for the frame.
- Connect pieces with rigid tie connectors and galvanized screws for strength.
- Cut a base and two side supports, and cross-brace the top to prevent wobbling.
- Elevate the base slightly with blocks or bricks to avoid moisture.
- Seal with an outdoor wood stain or paint to protect it from the elements.
Why It Works: This rack can sit in your backyard all year and handle heavy-duty storage, all while keeping your firewood off the ground and dry.
Minimalist Firewood Rack
Short on space but still need to keep your wood neat and dry? This minimalist rack is ideal for porches, patios, or indoor hearth setups.
How to Build This Firewood Rack
- Grab slim wood spindles or narrow balusters (found in the decking section of most home improvement stores).
- Cut to size based on how much wood you want to store.
- Use wood glue and exterior screws to assemble a simple rectangular frame.
- Add a few crossbars for stability and airflow.
- Stain or paint it to match your decor—it’s both functional and stylish.
Why It Works: This compact design is lightweight, customizable, and just the right size for weekend firewood or kindling. Plus, it looks good enough to show off.
Mistakes to Avoid When Building a Firewood Rack
Even the simplest of DIY projects can go sideways if you skip a step or just plain ol’ make a mistake. Here are some common things to keep in mind when building a firewood rack to help you get it right the first time.
- Building directly on the ground: Moisture is your biggest enemy. A rack that sits directly on soil or grass can lead to wet, rotting wood and an unstable base. Always elevate your rack using bricks, pavers, or treated lumber.
- Neglecting airflow: Keep things spaced for ventilation. Stacking logs too tightly or failing to leave gaps between boards can trap moisture. Good airflow means dry wood, which in turn means nice, clean burns.
- Using untreated or weak materials: Scrap wood is great … until it buckles under pressure. Use sturdy, weather-resistant materials, especially for outdoor racks that take a beating from the elements.
- Making it too tall: We get it — you want to store a lot of wood. But build too high and you’ll risk instability (and back strain). Keep it manageable: about 4 feet tall is ideal for most backyard racks.
- Placing it in the wrong spot: Avoid placing your firewood rack too close to your home or shed, as this invites pests like termites. Aim for a gap of 3–5 feet to strike a balance between convenience and safety.
Avoiding these missteps will make your DIY firewood rack last longer, look better, and keep your wood in tip-top condition all season.
Need Help With Outdoor Projects?
From firewood racks to fencing repairs, outdoor projects don’t have to be all sawdust and sweat. If you’d rather skip the measuring and drilling, your local Mr. Handyman® team is ready to step in. We offer reliable, professional help for a wide range of outdoor carpentry jobs. Stay cozy while we do the heavy lifting! Find your local Mr. Handyman today.
This article is intended for general informational purposes only and may not be applicable to every situation. You are responsible for determining the proper course of action for your home and property. Mr. Appliance is not responsible for any damages that occur as a result of this blog content or your actions. For the most accurate guidance, contact the Mr. Appliance location nearest you for a comprehensive, on-site assessment.
Frequently Asked Questions on How to Build a Firewood Rack
Mr. Handyman has been helping homeowners and businesses repair, maintain, and enhance their spaces for over 25 years! We are the one-stop solution for everything on your to-do list. This includes answering your questions about home repairs, maintenance, and improvements. Here are answers to some of your most frequently asked questions on making a firewood rack.
What is the best material to use for building a firewood rack?
Pressure-treated lumber, galvanized steel brackets, or durable hardwood are great options for making a firewood rack. These materials hold up well outdoors and provide the strength needed to support stacked logs.
How tall should I build my firewood rack?
When building a firewood rack, aim for a height of 4 feet or less. This ensures stability and easy access while minimizing the risk of tipping. Taller racks can become hazardous if not properly secured.
Can I build a firewood rack without tools?
Yes! Several DIY firewood rack ideas use minimal or no tools, like stacking 2x4s into cinder blocks or using pre-fab bracket kits. These are perfect for beginners looking for a fast and simple firewood storage solution.
Should a firewood rack be covered?
A firewood rack doesn’t have to be fully covered, but it should be protected from direct rain and snow. Elevating it off the ground and placing it near a wall with an overhang can help keep wood dry and ready to burn.
Where’s the best place to store a firewood rack?
Keep your firewood rack at least 3 to 5 feet away from your home or any wooden structures to discourage pests like termites. Choose a dry, ventilated area that gets sun but stays sheltered from direct moisture.